
Lawn
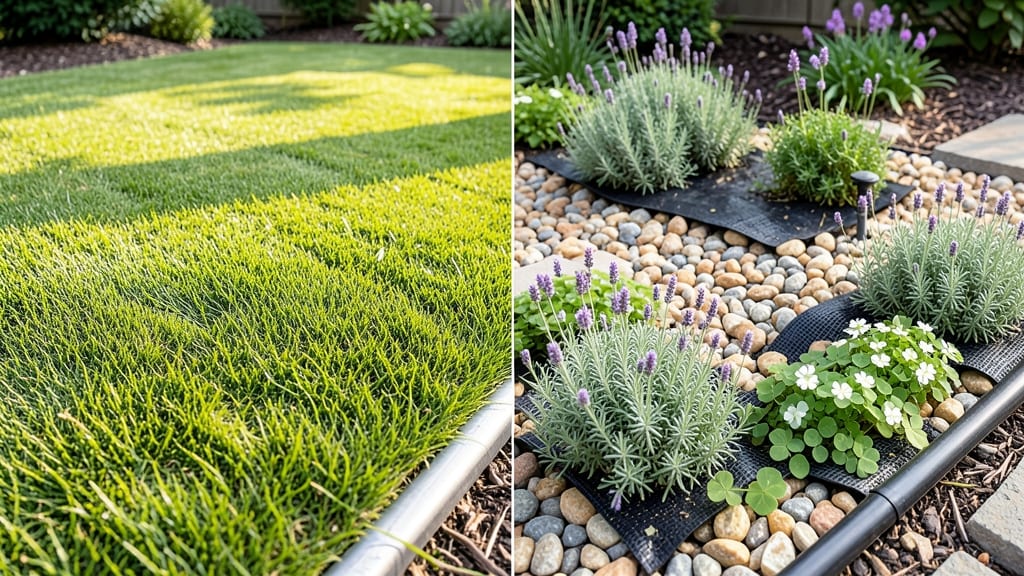
Replacing your lawn with gravel isn't just about saving time—it's about transforming your yard into a low-maintenance haven that stays gorgeous for decades. 🌿 I spent years mowing, watering, and patching brown spots until I finally swapped my front yard for crushed stone, and I haven’t looked back.
The before-and-after photos alone make it worth it.
Gravel eliminates weekly chores like mowing and watering while improving drainage and reducing weeds. You’ll save hundreds per year on upkeep, plus the modern look elevates curb appeal without the effort.
The right base layer keeps it stable, and with proper edging, it’ll last 10+ years with minimal effort—just occasional raking to maintain the look.
Design possibilities are endless: try a herringbone pattern for texture, pair it with drought-tolerant ground covers, or add stepping stones for a polished path. In hot climates, gravel stays cooler underfoot than grass, and in rainy areas, it drains excess water instead of turning to mud.
Even small spaces benefit—just 3 inches of gravel makes a difference.
Best of all, you can start small: replace just the high-traffic areas first and expand over time. The initial investment pays for itself in saved labor and water costs. Ready to trade mowing for a relaxing, stylish yard? Let’s get into the details.
📚 In This Guide
- What you need
- Instructions
- Tips and common mistakes
- Wrapping up and next steps
What you need
- ● Gravel: Crushed stone (¾” to 1½” diameter) – 2–3 tons per 100 sq. ft. (adjust for depth; 3–4” is ideal). Opt for polycrystalline or quartzite for durability.
- ● Landscape Fabric: Heavy-duty, UV-stabilized – Covers the entire area to block weeds. 1 roll ≈ 4’ x 50’ (calculate based on your space).
- ● Edging Material: Plastic or metal edging strips – 10–12” deep (prevents gravel from spreading).
- ○ Bricks, pavers, or natural stone – For a polished look (optional but recommended).
- ● Base Material: Crushed gravel or road base – 1–2” layer for drainage and stability.
- ○ Sand (optional) – ½” layer to level the base before adding gravel.
- ● Shovel & Rake – For digging and leveling.
- ● Wheelbarrow – To haul materials efficiently.
- ● Plate Compactor – Rental recommended to compress layers for stability.
- ● Measuring Tape & String Line – For marking edges and ensuring precision.
- ● Safety Gear: Gloves, goggles, and knee pads (trust us, your knees will thank you!).
- ● Check Local Regulations: Some areas require permits for major yard changes—always verify first! 🏛️
- ● Slope Consideration: For slopes >10%, add erosion control fabric or terraced layers.
- ○ Drainage Plan: Ensure proper slope (¼” per foot) to avoid puddles. Optional: Add a French drain if needed.
- ● Gravel Color: Choose a tone that complements your home’s exterior (neutral grays or earthy browns are timeless!).
Step-by-Step instructions for replacing your lawn with gravel
This transformation takes patience but pays off with a landscape that thrives on minimal effort.
🪴 Step 1: Remove Existing Grass and Prepare the Base
Start by cutting the grass as short as possible—this makes removal easier and reduces regrowth. Use a sod cutter or sharp spade to lift the entire sod layer in strips, working in 2-3 foot sections. I like to flip each strip onto the remaining grass to expose the soil underneath.
Once removed, rake away any remaining grass roots and debris with a stiff-bristle rake. The goal is bare, level soil with no organic matter left to decompose. For stubborn roots, a rented sod cutter or even a heavy-duty rake will help. This step is critical—leaving roots behind leads to weeds popping up later.
💧 Step 2: Compact the Soil and Install Landscape Fabric
After clearing the area, use a hand tamper or rented plate compactor to firm the soil. You want it as solid as possible—think of it as creating a foundation. Walk across the area and check for soft spots; compact those until your boot leaves no imprint.
Lay down landscape fabric with a 3-4 inch overlap at seams, securing edges with U-shaped landscape staples every 12 inches. The fabric prevents weeds from pushing through while allowing water to drain. I tuck the edges under any adjacent pavers or mulch beds to keep it flush. This is the moment that matters: skipping fabric means years of weeding battles.
☀️ Step 3: Add and Level Gravel for a Polished Look
Spread a 2-3 inch layer of crushed gravel (¾ inch minus) evenly across the fabric. I use a rake to create a base layer first, then go over it with a hand tamper to settle everything. For larger areas, rent a plate compactor to ensure even compaction—this prevents future sinking or shifting.
Next, add a top layer of decorative gravel (½ inch minus) in your chosen color. Use a screed board (a straight 2x4) to create a level surface: drag it across the area while holding it level with a 4-foot level. Fill any low spots with additional gravel, then rake the surface until it looks smooth and even. This step takes time but ensures your finished gravel bed stays flat and professional-looking.
✂️ Step 4: Define Edges and Add Final Touches
Install landscape edging (metal, plastic, or concrete) to contain the gravel and prevent it from spreading. Press the edges firmly into the ground or secure them with landscape staples. For curved edges, use a flexible edging tool or bend metal edging with pliers—this keeps the look clean and intentional.
Finally, add optional accents like border stones, decorative logs, or low-growing ground covers along edges. Water the gravel lightly after installation to help settle everything. Over the next few days, you may notice minor settling—just rake it smooth again. This is the part where your hard work starts to look effortlessly elegant.
Tips & tricks for perfect gravel landscaping
Transforming your lawn into a gravel oasis takes precision—and these pro tips will help you avoid common pitfalls while achieving that polished, professional finish.
Prep Like a Pro: In Step 1, when you're removing grass, consider renting a sod cutter if you're working with a large area. These machines make quick work of lifting entire sod strips, and the rental cost is minimal compared to the time you'll save. For stubborn roots, I've found that a rented sod cutter with a heavy-duty blade works better than a hand spade—it cuts through those deep roots cleanly. Remember, the more thorough you are here, the fewer weeds you'll battle later. This is where most people cut corners, and that's when weeds start their comeback.
Fabric Installation Secret: The 3-4 inch overlap in Step 2 is crucial for preventing weeds, but here's what nobody tells you—always overlap the seams in opposite directions like brickwork. This creates a stronger barrier against weeds pushing through. Also, when securing edges with landscape staples, drive them in at a slight angle (about 45 degrees) so they grip the fabric better. I've seen staples pop out when they're driven straight down, leaving gaps for weeds to sneak through. This small detail makes all the difference in long-term weed control.
Leveling Hack: For Step 3's leveling process, I recommend using a 4-foot level with a rubber base—it's more stable than a wooden one and won't damage your gravel. When dragging your screed board, do it in two directions (lengthwise and crosswise) to catch any uneven spots. For larger areas, consider renting a laser level for ultra-precision. The key is patience here—take your time to get it perfectly level, or you'll end up with low spots that collect water and high spots that look unprofessional. This is where your gravel bed's long-term stability starts.
Edge Finishing: When installing landscape edging in Step 4, don't just press it into the ground—dig a shallow trench (about 2 inches deep) along the perimeter first. This creates a solid anchor for your edging and prevents it from shifting over time. For curved edges, use a flexible edging tool to bend the metal cleanly without kinks. I've seen many DIYers struggle with this step, but taking the extra time here ensures your gravel stays contained and your design looks intentional for years to come.
Pro Tips for Replace Lawn With Gravel
- Transforming your lawn into a gravel oasis takes precision—and these pro tips will help you avoid common pitfalls while achieving that polished, professional finish.
- Prep Like a Pro: In Step 1, when you're removing grass, consider renting a sod cutter if you're working with a large area.
- Fabric Installation Secret: The 3-4 inch overlap in Step 2 is crucial for preventing weeds, but here's what nobody tells you—always overlap the seams in opposite directions like brickwork.
Frequently asked questions
Got questions about ditching your lawn for gravel? You’re not alone! Here are some of the most common concerns—and straightforward answers—to help you make the switch with confidence.
Will gravel attract pests like ants or rodents?
Gravel itself doesn’t attract pests, but organic debris (like leaves or grass clippings) can. Keep the area clean and consider a thin layer of landscape fabric under the gravel to deter burrowing insects. For rodents, avoid dense mulch piles nearby—gravel alone won’t invite them!
How long does gravel last before needing replacement?
High-quality gravel (like crushed stone or decomposed granite) can last 10–20+ years with minimal maintenance. Weeds may pop up over time, but a quick rake or herbicide spot-treatment keeps it looking sharp. Pro tip: Choose angular gravel—it locks together better than smooth pebbles!
Is gravel cheaper than maintaining a lawn long-term?
Yes!
While upfront costs (materials + labor) may be similar, gravel eliminates mowing, fertilizing, and watering bills. Over 5 years, homeowners typically save $500–$1,500+. Plus, no more gas for the lawnmower—just an occasional rake and weed pull!
Will gravel wash away in heavy rain or floods?
Not if installed correctly! A slope of 2–5% (away from your home) and compacted base prevent erosion. For high-risk areas, use edging or a retention border to keep gravel in place. Bonus: Gravel drains better than grass, reducing runoff!
Can I still have plants or flowers with gravel?
Use ground covers, succulents, or shallow-rooted perennials in designated "pockets" of soil. For a polished look, try mulch-free gravel gardens with drought-tolerant plants like lavender or sedum. Just avoid deep-rooted shrubs—they’ll compete with gravel’s stability.
What’s the best gravel for high-traffic areas?
For walkways or patios, choose crushed granite or limestone (1–2" size). These materials are durable, compact well, and resist shifting. Avoid pea gravel—it rolls underfoot and feels less stable. Pro move: Add a polypropylene landscape fabric under high-traffic gravel to extend its life.
Wrapping up and next steps
Replacing your lawn with gravel isn’t just a trend—it’s a smart, sustainable, and stylish upgrade that saves time, water, and money while boosting curb appeal. Whether you’re drawn to its low-maintenance elegance, drought-resistant durability, or versatile design, gravel offers a practical solution for modern homeowners.
Now’s the perfect time to take the leap—start by sketching your vision, gathering supplies, and diving in with confidence!
Ready to transform your outdoor space? Pick a weekend, gather your tools, and turn your yard into a low-stress oasis! 🌟