
Lawn
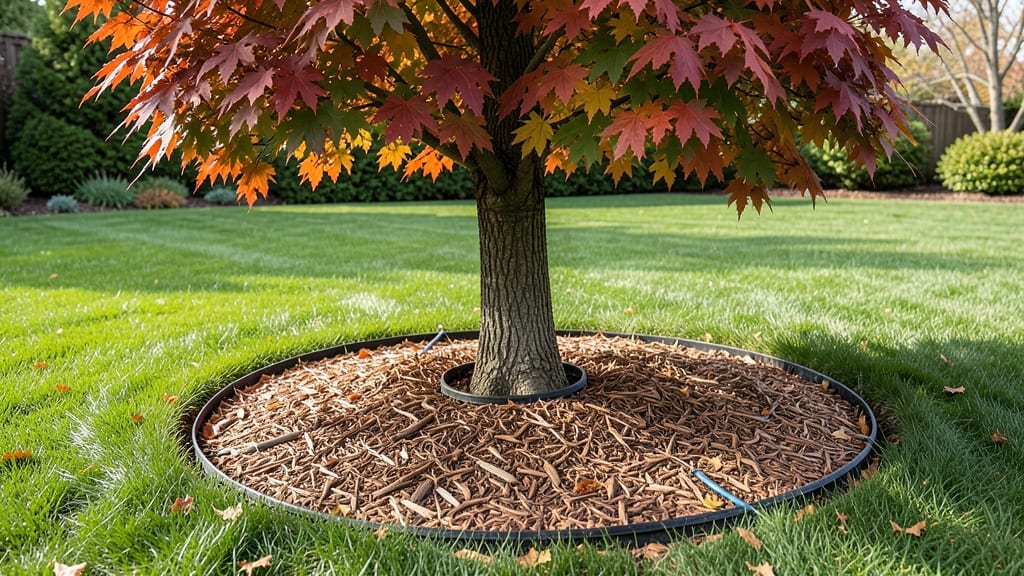
Mulched edges around trees transform your lawn from patchy to polished. ✨ The secret lies in creating a buffer zone that protects roots while keeping grass lush—no more struggling with bare spots or gopher-damaged turf.
I’ve spent years perfecting this technique, and the difference is night-and-day: healthier trees, fewer weeds, and a landscape that looks intentional (not accidental).
The key starts with spacing: keep grass at least 3 feet from the trunk for mature trees, closer for young ones. Use 2-3 inches of organic mulch (wood chips or shredded bark) to suppress weeds and retain moisture—just avoid piling it against the trunk.
This setup lets roots breathe while giving grass room to grow without competing for water.
What you end up with is a clean, disease-resistant transition zone where grass meets tree. The mulch breaks down slowly, feeding the soil while the grass stays vibrant. No more mowing right up to the trunk or dealing with that unsightly brown circle where grass refuses to grow.
Works for any yard size or tree type—oak, maple, or even your prized fruit trees. The same principles apply whether you’re fixing an existing mess or planning a new landscape. Here’s how to make it happen without the guesswork.
📚 In This Guide
- What you need
- Instructions
- Tips and common mistakes
- Wrapping up and next steps
What you need
- ● Mulch: 2–4 cubic yards (depending on tree size and lawn area). Opt for organic mulch (e.g., shredded bark, pine straw, or wood chips) for moisture retention and weed suppression.
- ● Landscape Fabric: 1–2 rolls (3–4 feet wide) to block weeds while allowing water drainage.
- ● Garden Edging: Flexible plastic, metal, or stone edging (10–20 feet, depending on tree circumference).
- ● Soil Amendment: Compost or topsoil (1–2 bags) to improve root health and drainage.
- ● Shovel & Rake: A flat-edged shovel and leaf rake for clearing debris and leveling mulch.
- ● Wheelbarrow: For hauling mulch, soil, and tools around the yard.
- ● Hose with Nozzle: For watering and keeping mulch in place.
- ● Measuring Tape & String: To mark mulch edges and ensure even distribution.
- ● Gloves & Knee Pads: For comfort and protection during manual work.
- ● Handheld Stake & String for precise edging.
- ● Post-hole Digger for securing edging stakes.
- ● Mulch Volcano Preventer (a simple tool to keep mulch 2–4 inches away from tree trunks).
- ● Pruners (for trimming overgrown roots or branches).
Step-by-step guide to creating a healthy lawn around trees
Here’s how to protect tree roots and keep your lawn lush without damaging either.
🪴 Step 1: Mark the Tree’s Root Zone
Use a garden hose or spray paint to outline a 3-foot radius from the tree trunk. This marks the critical root zone where most roots spread horizontally. Avoid disturbing this area—roots absorb water and nutrients, and damage here stresses the tree. If you’re unsure, dig a small test hole (about 6 inches deep) near the trunk to spot roots before proceeding.
I always sketch the outline on paper first. This helps visualize where to place mulch and where to keep the lawn mower away. Skipping this step often leads to accidental root damage when mowing or edging later.
✂️ Step 2: Edge the Lawn Cleanly
Use a half-moon edger or sharp spade to cut a crisp line between the lawn and the tree’s base. Angle the blade slightly upward to avoid digging into the root zone. Work in small sections, about 6 inches at a time, to maintain control. If the tree has a thick trunk, I like to create a slightly curved edge—it looks natural and prevents mower blades from creeping too close.
Don’t rush this step. A jagged edge leads to uneven mulch application and makes future maintenance harder. Test the depth of your cut—it should be just enough to separate grass from the tree without gouging the soil.
🌱 Step 3: Apply Mulch Properly
Spread 2–4 inches of organic mulch (like shredded bark or wood chips) in a donut-shaped ring around the tree, starting 6 inches away from the trunk. Keep the mulch even and level—piling it against the trunk suffocates the tree, while gaps let weeds grow. Use a rake to smooth the mulch and create a clean transition to the lawn.
I always check for gaps after spreading. Mulch should cover the entire root zone but never touch the trunk. If you’re using 4 inches of mulch, split it into two layers: apply 2 inches first, let it settle, then add the second layer. This prevents smothering roots over time.
💧 Step 4: Water Deeply and Monitor
Water the mulched area slowly and deeply until the soil 12 inches down feels moist. This encourages roots to grow deeper rather than staying shallow. Use a soaker hose or drip irrigation to avoid splashing mulch away. After watering, check for puddles—if water pools, the mulch layer is too thick.
Watch for mushroom growth or musty smells in the mulch. These are signs of excess moisture or poor airflow. If you see them, fluff the mulch with a rake to improve drainage. Healthy mulch should look dark, slightly damp, and free of debris.
☀️ Step 5: Maintain for Long-Term Health
Replenish mulch annually in early spring, adding 1–2 inches to maintain the 2–4 inch layer. Trim back any grass or weeds that creep into the mulched zone with a hand weeder or small hoe. Avoid using a string trimmer near the tree—it can tear roots and scatter mulch unevenly.
Every 2–3 years, refresh the mulch entirely. Old mulch breaks down into a fine, powdery texture that compacts and blocks water. If you notice the mulch turning gray or crumbly, it’s time to replace it. This keeps your lawn and tree thriving for seasons to come.
Tips & tricks for perfect tree-lawn transitions
These little details make all the difference between a neat garden and one that looks like it was done in a hurry.
Visual Planning Pays Off: Before you even touch your tools, grab a piece of paper and sketch your tree's root zone outline. I can't tell you how many times I've seen people skip this and end up with mulch piled against the trunk or grass creeping too close. That 3-foot radius isn't just a number—it's where 80% of your tree's roots live. Mark it clearly so you know exactly where to place your mulch and where to keep your lawn mower's blade away.
The Right Tools Matter: That half-moon edger might look simple, but using the wrong tool here can make the difference between a clean, professional edge and a jagged mess. If you don't have one, a sharp spade works too—but angle that blade upward to avoid digging into the root zone. And here's what nobody tells you: work in those 6-inch sections. Trying to do the whole tree at once leads to uneven cuts and frustration. Trust me on this.
Mulch Layering Secret: When you're applying that 2-4 inch layer of organic mulch, don't just dump it all at once. Start with 2 inches, let it settle for a day, then add the second layer if needed. This prevents smothering the roots while still keeping weeds out. And here's another pro move: use a rake to create a slight slope where the mulch meets the lawn. It makes water run off properly and looks more intentional.
Watering Wisdom: That 12-inch deep watering isn't just about quantity—it's about technique. Use a soaker hose placed just outside the mulch ring, not in the center. Water slowly until you can push your finger 12 inches down and feel moisture. If you see puddles forming, you've got too much mulch in one spot. The goal is to encourage those roots to grow deeper, not stay shallow where they'll dry out.
Pro Tips for Lawn Around Trees
- These little details make all the difference between a neat garden and one that looks like it was done in a hurry.
- Visual Planning Pays Off: Before you even touch your tools, grab a piece of paper and sketch your tree's root zone outline.
- The Right Tools Matter: That half-moon edger might look simple, but using the wrong tool here can make the difference between a clean, professional edge and a jagged mess.
Frequently asked questions
Got questions about maintaining a lawn around trees?
You’re not alone! Here are answers to the most common concerns—from timing to troubleshooting—so your landscape stays lush and healthy.
How close to the tree trunk can I mow my lawn?
Keep grass at least 3–4 inches away from the trunk to avoid damaging the bark or roots. Use a tree skirt or mulch ring to protect the base while mowing. Over-trimming can stress the tree and invite pests.
When is the best time to mulch around trees?
The ideal time is early spring or fall when soil is moist but not frozen. Avoid mulching in summer heat (it can bake roots) or winter (it may freeze). Apply a 2–4 inch layer of mulch, keeping it 6 inches away from the trunk.
What’s the best mulch for lawns around trees?
Opt for organic mulches like shredded bark, pine straw, or wood chips—they improve soil as they break down. Avoid dyed mulch (chemicals can harm roots) or rock mulch (it doesn’t regulate soil temp well).
My grass is dying near the tree—what’s wrong?
Common culprits: root competition, fungus (like armillaria), or over-mulching. First, check for volcano mulching (piled mulch touching the trunk). If fungus is suspected, remove infected grass and treat with copper fungicide.
Can I use ground cover instead of grass around trees?
Shade-tolerant plants
like hostas, heucheras, or creeping thyme thrive where grass struggles. They reduce mowing, retain moisture, and add color. Just ensure they won’t compete aggressively with the tree’s roots.
Wrapping up and next steps
Creating a well-maintained lawn around your trees doesn’t have to be a challenge—with the right mulched edges, you can achieve a clean, healthy, and low-maintenance landscape. 🌳✨ The key is balancing aesthetics, soil health, and tree protection, while keeping weeds at bay.
Start small, experiment with different mulches, and soon your yard will be the envy of the neighborhood!
Ready to transform your lawn? Grab your tools, pick your mulch, and get started today—your trees (and future self) will thank you! For extra inspiration, check out before-and-after galleries or local landscaping trends to keep your yard fresh and functional.