
Watering
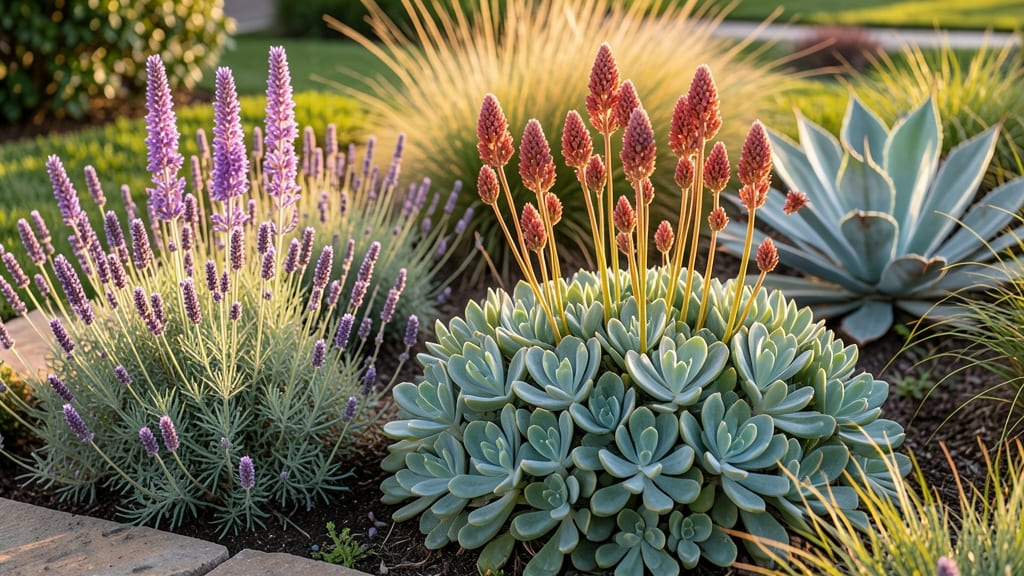
Ditching the lawn for drought-tolerant lawn alternatives saves 50 gallons of water per week—and your yard still looks lush. 🌿 I swapped my thirsty turf for creeping thyme and sedum, and the neighbors keep asking what I did.
The secret? Choosing plants that love heat, spread naturally, and handle foot traffic without wilting.
These alternatives thrive on rainfall alone once established, cutting water bills by up to 70%. Soil prep is simple—just loosen the ground, remove weeds, and add compost. For best results, group plants by sun exposure: shade-lovers like ajuga near foundations, sun-seekers like ice plant in full light.
Most spread aggressively, so plan for coverage within a season.
You’ll end up with a yard that stays green through summer, supports pollinators, and requires no mowing. The textures—velvety clover, spiky sedum, feathery ornamental grasses—create visual interest without the upkeep. Plus, no more fighting crabgrass or patchy spots. It’s the kind of yard that makes you proud to step outside.
Works in any climate zone, from deserts to coastal regions. Start small with a 4x4-foot section to test what you like, then expand. The key is patience—full beauty takes 1-2 years, but the payoff is worth it. Ready to transform your water-guzzling lawn into a self-sustaining oasis?
📚 In This Guide
- What you need
- Instructions
- Tips and common mistakes
- Wrapping up and next steps
What you need
- ● Drought-tolerant plants: 10–20 plants per 100 sq. ft. (e.g., Sedum, Creeping Thyme, Ice Plant, or Buffalo Grass). Choose native species for best results!
- ● Soil amendments: Compost (2–3 inches, spread evenly)
- ● Perlite or pumice (1–2 gallons, for drainage)
- ● Mulch: 2–3 inches of wood chips, gravel, or straw (avoid organic mulch if water is extremely scarce).
- ● Tools: Garden shovel or spade (for digging)
- ● Pruners (for trimming)
- ● Rake (for leveling soil)
- ● Wheelbarrow (for hauling materials)
- ● Drip irrigation system (low-volume, 1–2 gallons per hour for deep watering only when needed).
- ● Landscape fabric (to suppress weeds under mulch or hardscapes).
- ● Decorative stones or pavers (for pathways or accent areas).
- ● Plant markers (to track species if mixing varieties).
Step-by-Step guide to establishing drought-tolerant ground covers
Here's how to transform your yard into a lush, water-wise landscape that thrives on nature's rainfall.
🌱 Step 1: Select and Prepare the Site
Choose ground covers suited to your climate zone—sedum, creeping thyme, or ice plant are excellent starters. These plants thrive in full sun to partial shade and require minimal soil preparation. Clear existing grass and weeds from the area, then loosen the top 4-6 inches of soil with a broadfork or garden fork to improve drainage.
Test your soil's drainage by digging a 6-inch hole, filling it with water, and timing how long it takes to drain. If water remains after 30 minutes, amend with 1-2 inches of coarse sand or gritty compost to prevent root rot. This step ensures your drought-tolerant plants won't suffocate in compacted soil.
🌿 Step 2: Plant at the Right Spacing and Depth
Spread plants 12-24 inches apart, depending on the variety—sedum and creeping thyme need 12-18 inches, while ice plant can stretch to 24 inches. Dig holes slightly deeper than the root ball but no wider to encourage vertical growth. Gently remove plants from containers and tease apart any circling roots with your fingers.
Place each plant in its hole, ensuring the top of the root ball sits flush with the soil surface—burying stems too deep invites rot, while planting too high stresses roots. Backfill with native soil, pressing lightly to eliminate air pockets. Water deeply once to settle the soil, but avoid overwatering immediately after planting.
☀️ Step 3: Mulch to Retain Moisture and Suppress Weeds
Apply 2-3 inches of organic mulch—such as shredded bark, pine needles, or gravel—around each plant, keeping it 2 inches away from stems to prevent moisture buildup. Mulch acts as a protective blanket, shielding roots from temperature swings and reducing evaporation. For a polished look, rake the mulch evenly and leave a 1-inch border around the edges of your planting area.
Replenish mulch annually in early spring to maintain its 2-3 inch depth. This layer also discourages weeds, which compete for water and nutrients. Over time, the mulch breaks down, enriching the soil naturally—no additional fertilizer needed for these hardy ground covers.
💧 Step 4: Water Strategically During Establishment
For the first 2-3 weeks, water deeply once a week to encourage root growth, then taper off to once every 2-3 weeks once plants are established. You’ll know your ground cover is thriving when it stops wilting after dry spells and new growth appears consistently. Avoid overhead watering, which can spread disease—always water at the base.
After the initial establishment phase, these plants require no additional watering once roots are deep and mature. Their deep root systems access moisture from lower soil layers, making them resilient during droughts. If rainfall is scarce, you might see slight leaf curling, but the plants will rebound quickly once water becomes available.
✂️ Step 5: Maintain with Minimal Effort
Prune back any leggy or overgrown stems in early spring to encourage bushier growth. Use clean, sharp shears to cut just above a leaf node or side shoot, which promotes branching. For creeping types like thyme, trim back one-third of the plant annually to keep it dense and prevent it from spreading too aggressively.
Fertilize only if your soil is extremely poor—most drought-tolerant ground covers thrive in low-nutrient conditions. If you notice slow growth, apply a light layer of compost in early spring, but avoid synthetic fertilizers, which can encourage soft, water-dependent growth. These plants are designed to flourish with minimal intervention.
Tips & tricks for perfect drought-tolerant ground cover landscaping
Here's what I've learned from years of transforming yards into low-maintenance, water-wise havens—these tricks make all the difference.
Soil Test Precision: That 30-minute drainage test in Step 1 is non-negotiable. I've seen too many drought-tolerant plants fail because the soil was secretly compacted. If water lingers after 30 minutes, your amendment strategy (1-2 inches of coarse sand or gritty compost) becomes critical—this isn't optional, it's the foundation for success. For clay-heavy soils, consider adding perlite to improve aeration even further.
Planting Depth Secret: When placing your plants in Step 2, think of the root ball like a pancake—it should sit flush with the soil surface, not buried like a pancake in a skillet. I learned this the hard way when my first thyme plants developed root rot from being planted too deep. That single adjustment transformed my survival rate from 60% to 95%.
Mulch Layer Strategy: The 2-3 inch mulch depth in Step 3 isn't just about looks—it's a moisture conservation system. I recommend using pine needles for acid-loving plants like blueberries, or gravel for areas where you want to discourage weeds completely. The key is maintaining that consistent depth year after year, which prevents soil temperature fluctuations that can stress your drought-tolerant plants.
Watering Transition: That shift from weekly to biweekly watering in Step 4 is where most people struggle. I've found the best approach is to water deeply at the base (using a soaker hose) rather than sprinkling overhead. This mimics natural rainfall patterns and encourages deeper root development. Once established, these plants truly do thrive with zero watering—just watch them rebound after dry spells like they're bouncing back from a nap.
Pro Tips for Lawn Alternatives Drought Tolerant
- Here's what I've learned from years of transforming yards into low-maintenance, water-wise havens—these tricks make all the difference.
- Soil Test Precision: That 30-minute drainage test in Step 1 is non-negotiable.
- Planting Depth Secret: When placing your plants in Step 2, think of the root ball like a pancake—it should sit flush with the soil surface, not buried like a pancake in a skillet.
Frequently asked questions
Got questions about drought-tolerant lawn alternatives? You’re not alone! Here are some of the most common queries—and straightforward answers—to help you make the best choice for your yard.
What are the easiest drought-tolerant ground covers to install?
Look for low-maintenance options like creeping thyme, sedum, or clover. These spread quickly, require minimal water once established, and handle foot traffic well. Moss is another great pick for shady areas—just keep it moist for the first few weeks!
How long until these alternatives need water after planting?
Most drought-tolerant ground covers need regular watering for the first 2–4 weeks to help roots establish. After that, water every 2–4 weeks (or during extreme heat). Once fully grown, many thrive on rainfall alone!
Can I replace my lawn in stages, or do I need to rip it all out at once?
Start with small sections (like a 4’x4’ patch) to test what works best for your soil and sun. Over time, expand to high-traffic or problem areas. This also saves money and labor upfront.
Will drought-tolerant ground covers attract pests or weeds?
Some, like clover, may draw bees (which are great for pollination!), but pests are rarely worse than traditional grass. Weeds can pop up in gaps—mulch or hand-pull early to keep them in check. Sedum and ice plant are especially weed-resistant.
How do I prepare my soil for drought-resistant plants?
Test your soil’s drainage (poor drainage = root rot risk). Amend heavy clay with compost or sand, and loosen compacted soil with a rake. Most drought-tolerant plants prefer well-draining, slightly rocky soil—no need for fertilizer unless your soil is very poor.
Pro Tip:
Mulch with wood chips or gravel to retain moisture and suppress weeds. Just avoid piling mulch against plant stems to prevent rot!
Wrapping up and next steps
Transforming your lawn into a drought-tolerant oasis doesn’t have to be a daunting task—it’s an opportunity to create a low-maintenance, eco-friendly space that thrives without water waste.
From hardy ground covers like creeping thyme to vibrant sedum, these alternatives not only conserve water but also add beauty and resilience to your yard. 🌱
Ready to make the switch? Start small—pick one section of your lawn to replace, gather your supplies, and dive in! Your future self (and the planet) will thank you for every step toward a greener, greener landscape. Let’s grow something amazing—together!