
Lawn
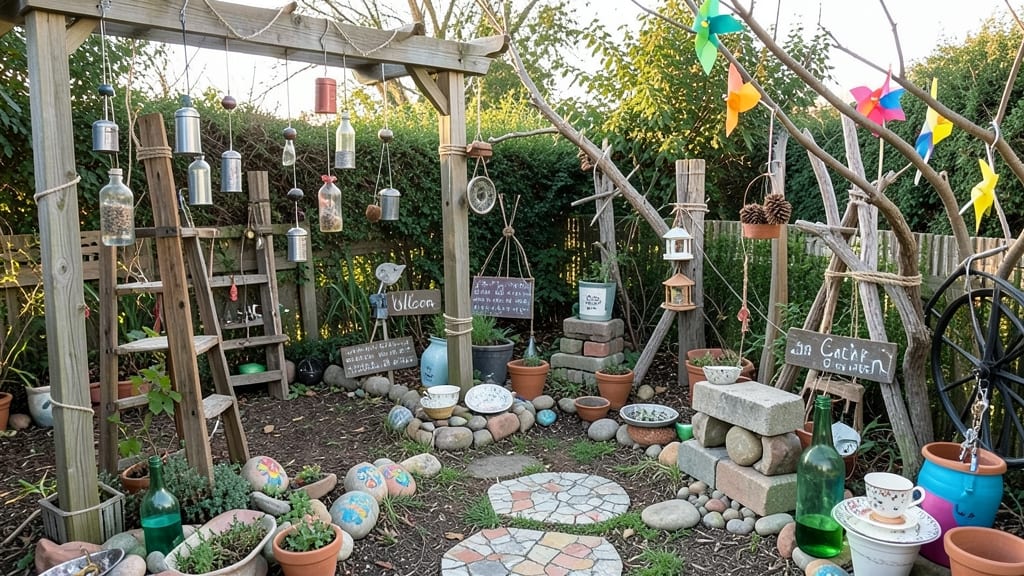
Your lawn could look like a curated garden showpiece without spending a dime. 🌿 Repurposing everyday items into inexpensive lawn decorations turns trash into treasure while adding personality to your outdoor space—no fancy shopping sprees required.
I’ve transformed old pallets into rustic benches, wine bottles into whimsical garden stakes, and even thrifted mirrors into statement focal points. The best part? These projects take under an hour and use materials you already have lying around.
No green thumb needed—just a little creativity and a willingness to see potential in the overlooked. You’ll end up with a backyard that feels intentional, not just functional.
Think mosaic stepping stones from broken dishes, wind chimes from recycled silverware, or a DIY fire pit from cinder blocks and scrap metal. The possibilities are endless, and the satisfaction of creating something beautiful from nothing is unmatched. Perfect for renters, first-time homeowners, or anyone tired of generic store-bought decor.
Let’s turn your yard into a reflection of your style—without the price tag.
📚 In This Guide
- What you need
- Instructions
- Tips and common mistakes
- Wrapping up and next steps
What you need
- ● Upcycled items: Old tires (1–3, depending on size)
- ● Broken terracotta pots (5–10)
- ● Plastic bottles (5–10, 1–2L size)
- ● Wooden pallets or scrap wood (1–2 pieces)
- ● Mason jars or glass bottles (3–5)
- ● Broken garden tools (e.g., rakes, shovels, 1–2)
- ● Basic tools: Hammer or mallet (for assembly)
- ● Screwdriver or drill (for securing pieces)
- ● Sandpaper (medium-grit, 1 sheet)
- ● Paintbrushes (2–3, various sizes)
- ● Scissors or utility knife (for cutting)
- ○ Measuring tape (optional but helpful)
- ● Decorative supplies: Acrylic paint (2–3 colors, non-toxic)
- ● Spray paint (1–2 colors, weather-resistant)
- ● Twine or jute rope (1–2 rolls)
- ● Pebbles, mosaic tiles, or broken dishes (for texture)
- ● Hot glue gun and glue sticks (for quick fixes)
- ● Solar-powered fairy lights (for evening ambiance)
- ● Chicken wire (to create rustic cages for plants)
- ● Old keys, gears, or metal scraps (for industrial vibes)
- ● Natural elements (pinecones, driftwood, or dried flowers)
- ● Stencils or sticker letters (for personalized touches)
Step-by-Step guide to creating inexpensive upcycled lawn decorations
Transform everyday items into stylish, eco-friendly yard art that adds character without breaking the bank.
🪴 Step 1: Gather Materials From Around Your Home
Start by scouring your garage, shed, or recycling bin for materials like old wooden pallets, broken terracotta pots, wine bottles, or even discarded metal tools. I like to save items like these for projects—they’re free and full of potential. Look for pieces with interesting textures or shapes, like rusted metal, weathered wood, or smooth glass, as these will add visual interest to your decorations.
Clean and prepare each item thoroughly. Scrub off dirt with soapy water, sand down rough edges, and remove any peeling paint or loose debris. For metal pieces, a wire brush works wonders for removing rust. The cleaner your base materials, the better they’ll hold up against weather and look in your yard. If you’re using glass, like bottles or jars, rinse them well and let them dry completely before moving to the next step.
✂️ Step 2: Design and Assemble Your Decorations
Sketch out simple designs on paper first—think of classic garden decor like birdhouses, wind chimes, or even abstract sculptures. I often start with a central piece, like a wooden stake or a large rock, and build around it. For example, a rusted garden gate can become the base for a whimsical trellis, while old ladders can be repurposed into vertical planters or artistic wall hangings.
Use basic tools like hammers, nails, screws, or strong adhesive to assemble your pieces. For a sturdy finish, pre-drill holes to prevent wood from splitting. If you’re working with metal, consider using heavy-duty zip ties or metal straps for a more industrial look. The key is to keep it simple—your decorations don’t need to be perfect, just functional and visually appealing. Think about how each piece will age naturally; rust and weathering can add charm over time.
💧 Step 3: Seal and Weatherproof Your Creations
Once your decorations are assembled, protect them from the elements to ensure they last. Use outdoor-rated sealants or paint designed for metal, wood, or concrete. For wood, I recommend a clear polyurethane or a semi-transparent stain to preserve the natural grain while adding durability. For metal, a rust-inhibiting primer followed by outdoor paint will keep it looking fresh. If you’re using glass, a clear sealant will prevent moisture from causing cracks over time.
Apply sealant in thin, even coats, allowing each layer to dry completely before adding another. This step is critical—skipping it can lead to your decorations warping, rusting, or deteriorating quickly. Let them cure for at least 24 hours before placing them in your yard. If you’re in a humid climate, consider adding an extra coat for added protection. Once sealed, your decorations are ready to add personality to your outdoor space.
☀️ Step 4: Arrange and Maintain Your Decorations
Place your finished pieces strategically around your lawn to create visual interest. Group similar styles together, like a collection of rustic metal pieces or a cluster of painted wooden accents. Consider the scale—larger items near entryways or along pathways draw attention, while smaller pieces can add charm to garden beds or patios. I like to mix heights and textures for a dynamic look that feels intentional rather than cluttered.
Check your decorations periodically to ensure they’re still secure and in good condition. Tighten any loose screws, replace rusted hardware, or reapply sealant as needed. With minimal upkeep, your upcycled decor can last for years, evolving naturally with your garden. The best part? You’ll save money and reduce waste while creating something uniquely yours.
Tips & tricks for perfect upcycled lawn decorations
Common pitfalls—and how to sidestep every one—when transforming trash into treasured yard art.
Material Selection Matters: Don’t overlook the charm of imperfect items! Rusty metal, weathered wood, and chipped ceramics often create the most interesting visual textures. In Step 1, prioritize pieces with character—think uneven edges or faded paint—these flaws become design features. For example, a broken terracotta pot with a jagged rim makes a stunning planter when paired with trailing ivy. The key is to embrace what you have rather than chasing "perfect" materials.
Design with Purpose: When sketching designs in Step 2, consider both function and form. For instance, if you’re creating a vertical garden, use an old ladder as your base—its rungs create natural planting pockets. Think about how each piece will interact with sunlight and rain; metal pieces may need extra sealing in humid climates, while wooden accents might fade faster in direct sunlight. Sketching rough dimensions first helps you visualize scale and prevents awkwardly sized decorations.
Sealing Secrets: The 24-hour curing time in Step 3 isn’t just a suggestion—it’s critical. Thin, even coats dry faster and create a more durable finish. For extra protection, apply a second coat in areas prone to moisture, like bases or undersides. I’ve found that using a brush instead of a roller gives textured surfaces (like rusted metal) better coverage. Pro tip: Test your sealant on a hidden spot first—some formulas may darken or alter the appearance of certain materials.
Arrangement Insights: In Step 4, group decorations by material or style to create cohesive focal points. For example, cluster all metal pieces together near a water feature to let their reflective qualities shine. Vary heights by placing taller items at the back and shorter ones in front. This creates depth and draws the eye through your garden. Don’t forget to consider seasonal changes—what looks perfect in summer might need adjustments for winter’s snow load or wind exposure.
Pro Tips for Inexpensive Lawn Decorations
- Common pitfalls—and how to sidestep every one—when transforming trash into treasured yard art.
- Material Selection Matters: Don’t overlook the charm of imperfect items!
- Design with Purpose: When sketching designs in Step 2, consider both function and form.
Frequently asked questions
about inexpensive lawn decorations—because every yard deserves a little personality without breaking the bank!What are the best materials for DIY lawn decorations on a budget?
Look for upcycled items like old tires, pallet wood, glass bottles, or even scrap metal. Nature also offers free options: smooth river rocks, pinecones, or driftwood. Just ensure materials are weather-resistant to avoid quick wear. Pro tip: Check local buy-nothing groups or thrift stores for hidden treasures!
When is the best time of year to install these decorations?
Spring and early summer are ideal for setting up decorations—mild weather makes assembly easier, and your yard will look fresh for summer gatherings. However, winter projects (like wind chimes or snow-friendly decor) can add charm too. Avoid extreme heat or rain to prevent damage during installation.
Can I paint or customize inexpensive decorations to match my yard’s theme?
Use outdoor-friendly paint, sealants, or even mosaic tiles to personalize items like wooden signs, garden stakes, or metal planters. Just ensure your paint is UV-resistant to prevent fading. Bonus: Stencils or freehand designs can elevate even the simplest upcycled piece!
How do I protect my decorations from pests or weather damage?
Seal wood with outdoor varnish, store fabric items (like wind spinners) under cover during storms, and avoid placing decorations in low-lying areas where moisture collects. For metal, a rust-resistant spray will work wonders. Regular checks for cracks or wear will help extend their lifespan.
Are there free alternatives to buying materials for lawn decor?
Yes! Scour your neighborhood for "free" items: curb alerts for discarded furniture, construction sites for scrap wood, or beachcombing for driftwood. Libraries, schools, and community centers often host free tool-sharing programs too. Think outside the box—your creativity is your best resource!
Wrapping up and next steps
Transforming your lawn into a charming, zero-waste oasis doesn’t have to break the bank—or harm the planet! 🌿 With a little creativity, you can turn everyday items into stunning, budget-friendly decorations that reflect your unique style.
Whether you’re repurposing old tires, glass bottles, or driftwood, these projects prove that sustainability and aesthetics go hand in hand.
Ready to get started? Pick one project from this guide, gather your materials, and let your imagination run wild! Your lawn—and the environment—will thank you. 💚